Using private DNS-server with Bind 9

DNS or Domain Name System handles translating domain names to IP-addresses. We can also configure it to do the opposite — resolve IP-addresses to domain names.
BIND or BIND 9 is an open source implementation of DNS, available for almost all Linux distributions. BIND stands Berkeley Internet Name Domain & it allows us to publish DNS information on the internet as well as allows us to resolve DNS queries for the users. BIND is by far the most used DNS software on the Internet.
There are some reasons to use private DNS: the need to host own zones, avoiding slow and unreliable ISPs DNS or network traffic saving. For this purpose, we will use Bind 9 on Ubuntu system, as it is by far the most used DNS software.
Installation and configuration
For minimal usage, you need to install one service. Open your terminal and execute the following command:
~$ sudo apt-get install bind
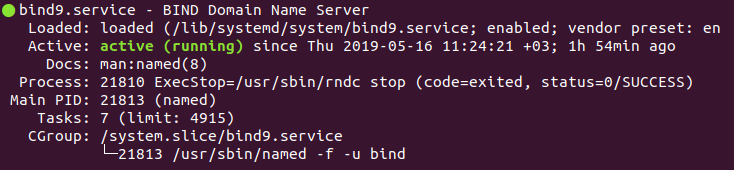
Verify installation by running the service and checking its status:
~$ service bind9 start
~$ service bind9 status
If successful, you will see a similar output:
By default, the server cannot resolve any query. We can change this by adding zone files and reverse lookup zone files as well as by providing our services with forwarders. DNS query will be forwarded to them when our server is unable to resolve a query. All of this is done in configuration files that are located in ‘/etc/bind’ directory. Particularly, we are interested in ‘/etc/bind/named.conf.options’ file in which we can set the following parameters:
options {
 directory "/var/cache/bind";

 recursion yes;
 allow-query { localhost; 192.168.0.0/24; };

 forwarders {
 8.8.8.8;
 8.8.4.4;
 };
 forward only;

 dnssec-validation auto;

 auth-nxdomain no; # conform to RFC1035
 listen-on port 53 { localhost; 192.168.0.0/24; }
 listen-on-v6 { any; };
};
- allow query to DNS from our private network only;
- allow recursive query;
- specify DNS port (53);
- set forwarders which we already mentioned.
For our local network settings, we have specified the following parameters:
Recursion is performing recursive queries to authoritative DNS-servers. For example, for foo.example.com the server would first query the root servers to get the server responsible for `.com` TLD (Top-Level Domain). Then it would ask those servers for `example.com` and, finally, it would query `example.com` for `foo.example.com`.
As an alternative to specifying an access list direct in `allow-query`, it can be created using ACL (Access Control List):
acl “private-network-only” {
 localhost; 192.168.0.0/24;
};
And use it in our `named.conf.options` file as follows:
allow-query { “private-network-only”; };
There are also ‘allow-query-cache’ and ‘allow-recursion’ parameters alongside the ‘allow-query’. The last one defines who can send any query to the server. ‘allow-query-cache’ is used to restrict who has access to cached data, i.e. the server has previously resolved the same query with recursion. ‘allow-recursion’ behaves similar, allowing performing recursive queries. Note, that if no ACL was provided for ‘allow-recursion’, Bind will use ACL from ‘allow-query-cache’, and in case this one is also missing it will fallback to ‘allow-query’, which we use.
Next important configuration file is ‘/etc/bin/named.conf.local’ in which we will define the zone files for our domain ‘vironit.com’:
zone “vironit.com” {
 type master;
 file “/etc/bind/com.vironit.rpz”;
};

zone “55.156.144.185.in-addr.arpa” {
 type master;
 file “/etc/bind/com.vironit.rev.rpz”;
};
Here we mentioned locations for forwarding lookup zone and reverse lookup zone files. First, we create a forward lookup zone. We can use a sample zone file (‘db.local’) that is already in ‘/etc/bind’ as a source:
$TTL 43200

@ IN SOA ns.vironit.com. root.vironit.com. (
 2019051501 ; Serial number YYMMDDNN
 12h ; Refresh
 1h ; Retry
 1w ; Exprire
 1h ; Minimum
)

@ IN NS ns.vironit.com.

ns IN A 8.8.8.8
@ IN A 185.144.156.55
www IN A 185.144.156.55
Here, we have added information regarding DNS server (Google public DNS is used as an example) and a few A records. Remember to put dots at the end of URLs!
Next, we will create a reverse lookup zone. Again, a sample file (`db.empty`) is available for us to use as a source:
$TTL 43200

@ IN SOA ns.vironit.com. root.vironit.com. (
 2019051502 ; Serial number YYMMDDNN
 12h ; Refresh
 1h ; Retry
 1w ; Exprire
 1h ; Minimum
)

@ IN NS ns.vironit.com.

ns IN A 8.8.8.8
@ IN PTR vironit.com
@ IN PTR vironit.com
Now, all we have to do is to restart the Bind service for the changes to take effect:
~$ service bind9 restart
Note, your OS firewall might not allow connections to DNS default port which is 53. In this case, you can allow adding a rule to your firewall:
~$ sudo ufw allow 53
Rule added
Rule added (v6)
Validating the syntax of configuration files
If you want to verify the syntax of your configuration files and zone files you can use commands `named-checkconf` and `named-checkzone` to verify them respectively:
~$ sudo named-checkconf /etc/bind/named.conf.local
~$ sudo named-checkzone vironit.com /etc/bind/com.vironit.rpz
zone vironit.com/IN: loaded serial 2019051501
OK
~$ sudo named-checkzone vironit.com /etc/bind/com.vironit.rpz
zone vironit.com/IN: loaded serial 2019051502
OK
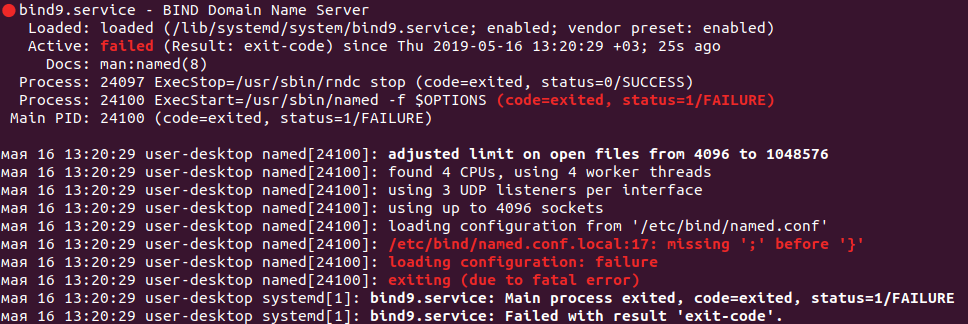
If there is no syntax error in your Bind configuration file, then it should return to shell without showing any errors.
Otherwise, you will run into errors upon Bind restart:
Testing the DNS-server
To test out DNS-server we will use another Ubuntu machine and change its DNS settings to point to our server. To do that we need to add a record in `/etc/resolv.conf`:
nameserver 192.168.1.128
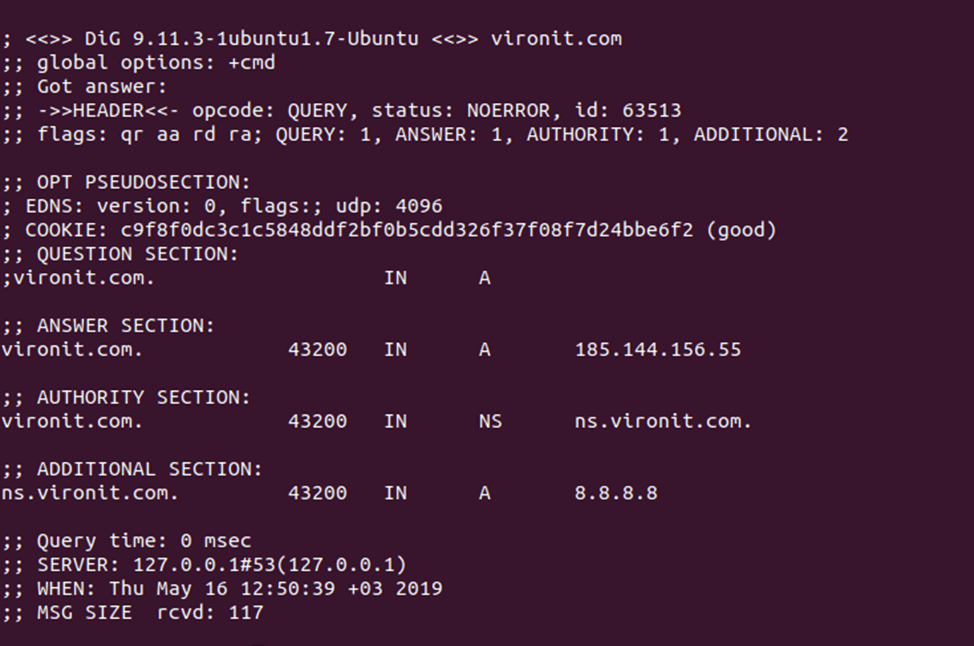
192.168.1.128 is IP-address of our DNS-server. Once done, we can now use a tool called `dig` to check our server:
~$ dig vironit.com
… and we should get the following output, indicating that our DNS is working fine:
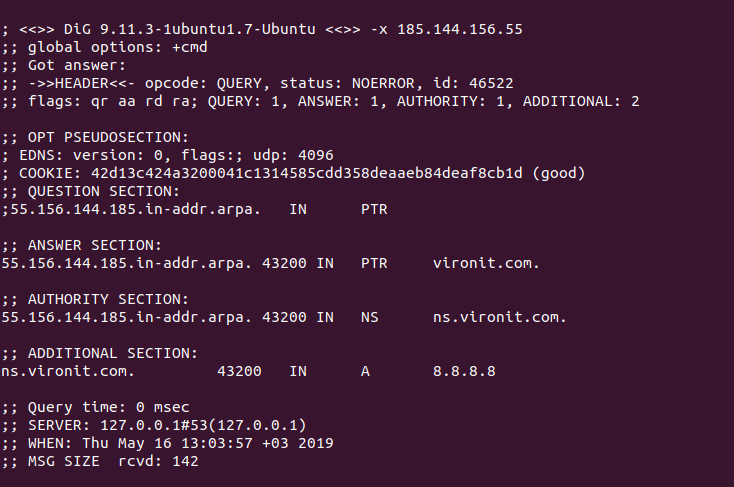
Now let’s do the reverse lookup:
~$ dig –x 185.144.156.55
The output should be something like below:
Note, while running `dig` command you may encounter `Command not found` error. This means that you need to install `dnsutils` package:
~$ sudo apt-get install dnsutils
 (1 votes, average: 5.00 out of 5)
Stay tuned. Monthly digest of the best stories.