Advanced routing in Angular 2+

Angular router is a powerful library built and maintained by Angular core team for performing navigation between views of a single page application. It provides a developer with convenient easy-to-use tools and features such as multiple router outlets, different path matching strategies, easy access to route parameters and route guards to protect components from unauthorized access. Not in vain that routing is considered to be one of the strongest sides of Angular and it is really important to understand this topic as Angular maintains its enterprise lead among full-stack developers according to CloudAcademy research.

Writing this article, I assume that you are already familiar with Angular router basics, if not, take a look at the official documentation. So, let’s dive into and make acquaintance with some advanced features.
Lazy loading
The first thing I want to talk about is modules Lazy Loading. Generally, it is a design pattern, which the main goal is to enhance performance by postponing initialization of some entities until it is directly needed during the application work. But how does it improve performance specifically in an Angular app?
While your application grows up, you split it into several parts, which are called feature modules, it is basic Angular approach and there is nothing new or advanced in it. But by default, all of them are added and loaded as one bundle, when you open application in a browser, so it can take a relatively long time to complete this loading and affect user experience. I will use one of my apps to explain and show everything by example.
At the moment this application is straight forward without any lazy loading. Let’s inspect it with Augury, which is a browser extension for debugging Angular apps.
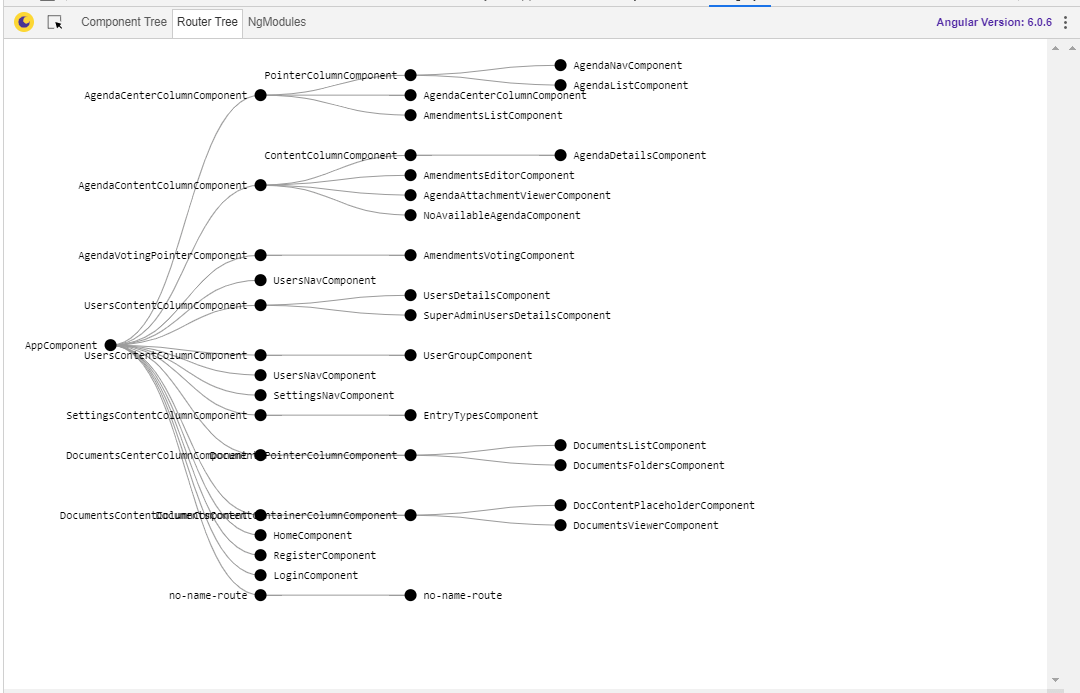
That is how the router tree looks like now. What we are going to do now, is to choose one module and refactor the app to make it lazy loaded. I have chosen one that is called agenda.module and occurs one of the largest.
Each module, including app.module and agenda.module has its own routing configuration file, which is imported as RouterModule.forRoot(), and all feature modules are imported in the app.module, thanks to which we can see such router tree on the picture above. That is how the code looks like:
let LAYOUT_ROUTES = [
 {
 path: 'register',
 component: RegisterComponent,
 },
 {
 path: 'login',
 component: LoginComponent,
 canActivate: [UnauthorizedRouteAccessService]
 },
];

@NgModule({
 imports: [
 RouterModule.forRoot(LAYOUT_ROUTES),
 SharedModule
 ],
 exports: [
 RouterModule
 ]
})
export class LayoutRoutingModule { }
routes for app.module
const AGENDA_ROUTES: Routes = [
 {

 path: 'agenda',
 component: AgendaCenterColumnComponent,
 data: {
 scope: ['admin', 'user'],
 },
 canActivate: [UserRouteAccessService],
 canActivateChild: [UserRouteAccessService],
 children: [
 {
 path: '',
 component: PointerColumnComponent,
 children: [
 {
 path: 'sections/:id',
 canActivate: [AgendaAccessService],
 component: AgendaNavComponent,
 },
 {
 path: 'list',
 component: AgendaListComponent,
 canActivate: [AgendaAccessService],
 data: {
 scope: ['admin', 'user'],
 },
 },
 ],
 },
 {
 path: 'noAvailable',
 component: AgendaCenterColumnComponent,
 },
 {
 path: 'amendments/:docId',
 component: AmendmentsListComponent
 },
 ]
 }
];


@NgModule({
 imports: [
 CommonModule,
 RouterModule.forRoot(AGENDA_ROUTES),
 SharedModule,
 ],
routes for agenda.module
To make agenda.module lazy loaded, we have to add the following part to app.module routes:
{
        path: 'agenda',
        canActivate: [UserRouteAccessService],
        loadChildren: '../agenda/agenda.module#AgendaModule'
    },
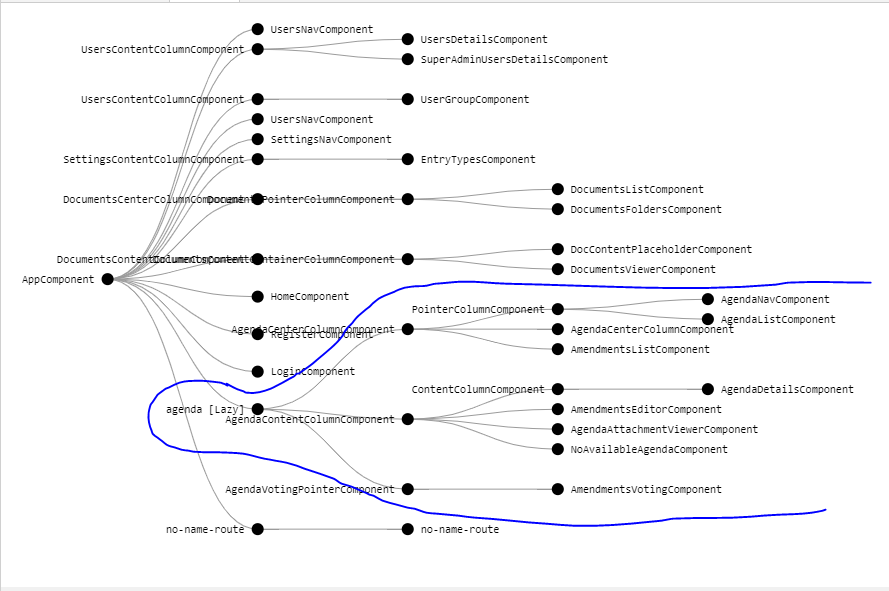
Key loadChilren represent a relative path to our agenda.module.ts file, after #-symbol the name of the class with @NgModule decorator should be written. The next step is to change RouterModule.forRoot(AGENDA_ROUTES) to RouterModule.forChild(AGENDA_ROUTES). We do this, because our root path ‘agenda’ is moved to app.module now, and it will match, when ‘/agenda’ is entered to address string after the domain name, while navigation through will be executed in subroute part ‘/agenda/<here>’. And don’t forget to remove AgendaModule import from the app.module, otherwise angular will throw you an error. After reloading the application and inspecting it with Augury one more time we can see, that node ‘agenda’ with label [Lazy] was added to router tree. And, with comparison to the previous picture, our tree became smaller, because all agenda routes have gone. But don’t worry, they will appear as soon as we enter ‘/agenda’ as an URL and make out lazy feature module load.

We have added lazy loading and now huge and massive agenda module in not load at once after application start, but on the other hand, when user will navigate to ‘/agenda’, he can face a small delay, caused by fetching this agenda.module. That’s weird because all this stuff we do pursues the main goal: enhance performance. And again guys from @angular/core development team have provided such occasion and implemented Preload Strategy feature. This configuration tells router, how and when to load lazy modules.
imports: [
    RouterModule.forRoot(
      routes,
      {
        preloadingStrategy: PreloadAllModules
      }
    )
  ],
In this case, PreloadAllModules strategy defines a behaviour, when Angular loads lazy modules asynchronously after the app loads instead of waiting for a user to click the particular link and request this module. A strategy is defined in app.module and influence all feature lazy modules. In this way application loads quickly, allowing a user to begin his journey through it and preloads rest modules in the background, eliminating the delay.
And of course, Angular provides developers with the freedom to customize their application according to their needs. This case is not an exception, so we can implement custom preload strategy by defining the @Injectable() class, which is implementing the PreloadingStrategy interface. It can be useful, for example, not to preload lazy modules, which are rarely visited by website visitors.
import 'rxjs/add/observable/of';
import { Injectable } from '@angular/core';
import { PreloadingStrategy, Route } from '@angular/router';
import { Observable } from 'rxjs/Observable';

@Injectable()
export class CustomPreloadingStrategy implements PreloadingStrategy {
 preloadedModules: string[] = [];

 preload(route: Route, load: () => Observable<any>): Observable<any> {
 if (route.data && route.data['preload']) {
 this.preloadedModules.push(route.path);
 return load();
 } else {
 return Observable.of(null);
 }
 }
}
{
 path: 'agenda',
 loadChildren: '../agenda/agenda.module#AgendaModule',
 data: { preload: true }
}
In this example, we define strategy, which will preload module only if the preloaded flag is set to true, and mentioned in data properties of the route. And don’t forget to add your custom strategy class to the provider’s array of app.module.
By the way, the performance gain is not the only benefit of lazy loading pattern. It also helps to encapsulate modules, make them more independent and maintainable, affords to manage unauthorized or unauthenticated routes access more efficient, by adding guards to root paths and so on.
Now we have done our best to speed up our application and improve user experience.
Multiple outlets and auxiliary routes
Another important and interesting thing about an Angular router I want to mention in this article is auxiliary routes.
Competently built routing may not only improve performance, speed and convenience of application usage but also make architecture more logical, understandable and scalable. Typically, applications follow similar patterns, but sometimes designers give challenges, which make us puzzle over the most efficient solution. And that’s great, I’d suppose that all of us really want to be architects, not just coders:). As an example, I will use the application afire mentioned. I can’t disclose its design, let’s draw a bit.
| Side nav | Center section | Content section |
| <router-outlet> | <router-outlet> | |
| static | independent | independent |
This is how an application’s global layout looks like. Let me explain more precisely. So, the screen is always split into 3 big parts: side nav with menu items, centre section and content session. Well, nothing special at first sight, but the problem is, that centre and content sections are almost independent and can change their views without affecting each other. Not quite a trivial task. Trying to handle it with standard approach can lead to spaghetti-code, lack of scalability and bugs or super complicated routing configuration with multiple match checks and redirections (looks not very convenient). And here comes auxiliary routes and named outlets. So what is it?
Navigation in Angular app happens in ; tag. It has to be added to the component’s template, so the component can play the role of a “container” and have its own child route. It is evident, that there can be multiple router outlets in an application but they are on “different levels” of the routing tree. If we wanted to add several outlets, for example, in app.component.html, it wouldn’t have had any sense. But seems like that is exactly what we need — two independent router outlets in one global container. A component can have one associated primary route and multiple auxiliary routes, which allow navigating multiple routes at the same time. To create an auxiliary route, you’ll need a named router outlet where the component associated with the auxiliary route will be displayed.
<router-outlet></router-outlet>
<router-outlet  name="outlet1"></router-outlet>
Only a primary outlet can be a no-name outlet, the other outlets must have a name.
To define the paths and components of the named outlet, you should specify an outlet:
{
 path: "<your path>",
 component:<your component>,
 outlet: "outlet1"
}
Let’s take a look at a real example:
<div class="app-container" [class.user]="isUser">
 <app-sidebar-menu *ngIf="isAuthenticated()" [class.toggled]="opened" #sideBar></app-sidebar-menu>
 <button mat-icon-button *ngIf="isAuthenticated()"class="sidebar-menu-toggle" [class.opened]="opened" (click)="toggle()">
 <div class="sidebar-menu-toggle-burger">
 <span></span>
 </div>
 <svg mat-line aria-hidden="true" class="icon icon_sm-delete">
 <use mat-line xlink:href="#icon_sm-delete"></use>
 </svg>
 </button>
 <router-outlet></router-outlet>
 <div class="home-container" [class.fullview-doc]="!expanded" [class.hidden]="!isAuthenticated()" >
 <div class="pointer-section" #pointerSection>
 <router-outlet name="center"></router-outlet>
 </div>
 <div class="content-section" #contentSection>
 <router-outlet name="content"></router-outlet>
 </div>
 </div>
 <div class="fader" [class.active]="opened && isAuthenticated()">
 </div>
</div>
That is how app.component.html for our design looks like. Side nav is represented as a separate component <app-sidebar-menu> and its appearance is managed mostly with CSS. Div-element with class=”home-container” includes our named outlets for rest two parts and here it is, where all our magic happens. You could notice unnamed primary outlet and, perhaps, ask a question “why do we need three outlets here”. Well, as I have said, everything happens in named outlets, but in this app, I have authentication part with login, registration and other accompanying stuff and decided to entirely give a primary outlet to this.
And now let’s take a look at already known to us agenda.module’s routing.
export const AGENDA_ROUTES: Routes = [
   {

       path: '',
       component: AgendaCenterColumnComponent,
       outlet: 'center',
       data: {
           scope: ['admin', 'user'],
       },
       children: [
           {
               path: '',
               component: PointerColumnComponent,
               children: [
                   {
                       path: 'sections/:id',
                       component: AgendaNavComponent,
                   },
                   {
                       path: 'list',
                       component: AgendaListComponent,
                       data: {
                           scope: ['admin', 'user'],
                       },
                   },
               ],
           },
           {
               path: 'noAvailable',
               component: AgendaCenterColumnComponent,
           },
           {
               path: 'amendments/:docId',
               component: AmendmentsListComponent
           },
       ]
   },
   {
       path: '',
       component: AgendaContentColumnComponent,
       outlet: 'content',
       data: {
           scope: ['admin', 'user'],
       },
       children: [
           {
               path: '',
               component: ContentColumnComponent,
               children: [
                   {
                       path: 'details/:id',
                       canActivate: [AgendaAccessService],
                       component: AgendaDetailsComponent,
                   },
               ]
           },
           {
               path: 'editor/:editedDoc',
               component: AmendmentsEditorComponent,
           },
           {
               path: 'attachment/:type/:attachmentId',
               component: AgendaAttachmentViewerComponent,
           },
           {
               path: 'noAvailable',
               component: NoAvailableAgendaComponent,
           },
       ]
   },
 ];
You can see that it consists of two named parts with child routes. It is important, that links, router.navigate method and URL string in browser look completely different in comparison with simple router outlet.
[routerLink]="['',{ outlets: {primary:null, center: ['manage'], content: ['group', 'manage'] } }]"
Primary route path can be specified as the first element of routing array, and a second element is an object, where named outlets paths are described. And it is possible to set primary outlet here as well. Notice, that URL parts of the path are also represented as an array of strings, not as a single string — for example, link to ‘agenda/editor/12’ for content outlet will be [routerLink]=”[”,{ …, content: [‘agenda’, ‘editor’, ‘12’] } }]”
For navigation with the help of navigating function of Router dependency the same pattern is used:
this.router.navigate(['',{ outlets: { center: ['agenda', 'amendments', 12], content: ['agenda', 'editor', item.id] } }])
After calling the function, listed above, in the address bar you will see the following:
- (center:agenda/amendments/12//content:/’agenda’/’editor/12′).
Auxiliary routes paths are taking in parentheses, the name of the outlet goes first, then, after a colon URL is written, as usual, different named outlets are separated with ‘//’. It may look scary and complicated, but it isn’t, you will get used to it really quickly and, I promise, you will like this feature. But don’t use it, when there is obviously no need to. Remember, the simpler the better. In most cases, simple router outlet can cope with your needs, but if you get a non-trivial task, that requires something special, you know what to do now.
Conclusion
We have discussed two powerful angular router features, which are really important to know and understand. Using them properly will help you to make your code cleaner, application faster, user experience better, your life easier.
There are still many worthies of discussion router features, such as tracing, router animation, guards, route resolvers and so on and, we will get acquainted with them in the next articles.

 (5 votes, average: 4.80 out of 5)
Stay tuned. Monthly digest of the best stories.